Users can create Binding rapidly and with ease using RapidConnect Desktop's Binding window.
| Info |
|---|
Once devices are on a network, they can perform binding. This is where devices create bindings to establish application layer links. For example, an On/Off switch may perform binding to create a binding to an On/Off Light. Binding must be configured in order to receive attribute reports, receive commands from remote control devices and to receive IAS zone state updates. |
In order to create a Binding, open the 'Binding' window.
![]()
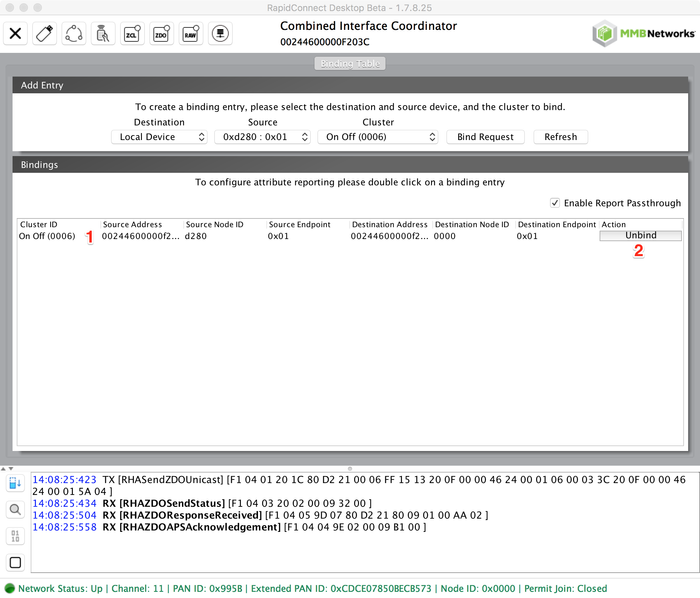
See below for a description of the Binding window components:
- Destination: This is the destination of the attribute report, in this case the coordinator. Select 'Local Device'.
- Source: The source of the report, in this case the dimmable light configured device.
- Cluster: Once the source endpoint is selected it will populate the cluster list. Select cluster 0x0006 (On/Off cluster).
- Send Bind Request: Clicking on the ‘Bind Request’ button will send the request to the Source device, which in turn will respond.
- Enable ZCL Passthrough: With RapidConnect, attribute reports can be automatically passed up from the module to the Host application (RapidConnect Desktop) by enabling the ‘Attribute Report Passthrough’ control (see /wiki/spaces/RZ3/pages/74317865 for more information). Attribute reports are passed up to the host application and the application then handles the report. If the passthrough is not enabled, the attribute report will be handled by the module and then discarded.

Once the binding is successful it will be shown in the binding table. The binding table also reads current bindings configured on the Source device.
- Binding Table Entry: Bindings currently configured on the Source device
- Unbind Button: Request binding record to be removed.
| Panel | ||||||
|---|---|---|---|---|---|---|
| ||||||
|
| Style |
|---|
{style} .wiki-content h1 { font-family: 'Helvetica Neue', sans-serif; font-size: 30px; font-weight: bold; color: #7ab800#20b6e1; letter-spacing: 1px; line-height: 1; text-align: left; #border-bottom: 1px solid #98bddd !important; } .wiki-content h2 { font-family: 'Helvetica Neue', sans-serif; font-size: 20px; font-weight: normal; color: #a1cd4c#00517f; letter-spacing: 1px; line-height: 1; text-align: left; } .wiki-content h3 { font-family: 'Helvetica Neue', sans-serif; font-size: 15px; font-weight: bold; color: #a7a9ac#00517f; letter-spacing: 1px; line-height: 1; text-align: left; } .wiki-content h4 { font-family: 'Helvetica Neue', sans-serif; font-size: 15px; font-weight: normal; font-style:italic; color:#a7a9ac#00517f; letter-spacing: 1px; line-height: 1; text-align: left; } #title-text{ font-family: 'Helvetica Neue', sans-serif; font-size: 40px; font-weight: 500; letter-spacing: 1px; line-height: 1; text-align: left; } .panel, #content .panel { -moz-border-radius: 5px; -webkit-border-radius: 5px; border-radius: 5px; } .panel .panelHeader { text-align: left; color: #FFFFFF; line-height: 1em; padding: 10px 10px 5px; margin-bottom: 0; background-color: #7AB800#00517f; -moz-border-radius-topleft: 5px; -moz-border-radius-topright: 5px; -webkit-border-top-right-radius: 5px; -webkit-border-top-left-radius: 5px; border-top-right-radius: 5px; border-top-left-radius: 5px; color:#FFFFFF } {style} |