Prerequisites
The following items are required to execute the steps described in this guide.
- Z357PA2x or Z357PA4x module loaded with RapidHA v1.7.0 or higher
- RapidConnect Programming Fixture, to facilitate a convenient serial USB connection to the module
- PC or Mac operating RapidHA Desktop v1.5.2 or higher
- External Power Supply
| Anchor |
|---|
| Hardware Test Points |
|---|
| Hardware Test Points |
|---|
|
Hardware Test Points
Minor modifications to the Module are required such that it may be powered by an external 3.3V supply. This ensures accurate current draw measurements that are not influenced by external components on the fixture (e.g. LED's, USB, etc.).
The following pins on the Module must to have test points added as follows:
- VCC
- GND
- To facilitate the Module fitting in the fixture, it is recommended to solder the wire to the shield
- Z357PA2x - PIN 15
- Z357PA4x - PIN 18
Once modified, the Module should be loaded into the MMB Programming Fixture for configuration, after which it will once again be removed ahead of current draw testing.
Please ensure that the power supply is able to handle an increase in current draw upon the Module waking, as the application will immediately poll the network.
Startup Synchronization and Device Type Configuration
Please see Startup Synchronization for a detailed overview of the Host to Module serial configuration process.
Please see Device Type Configuration for a detailed overview of available device types and their configuration. This tutorial focuses on the Reduced Function Device (RFD) configuration required for Sleepy End Devices.
There are two ways you can configure the device as a Sleepy End-Device, which are described in subsequent sections:
- Use RapidHA Desktop and a preconfigured XML file to configure the module, via a serial USB connection
- If you already have a Startup Synchronization process to configure the module, modify the Device Type Write frame to configure the module as a sleepy end-device
| Anchor |
|---|
| Configuring RapidHA Sleepy |
|---|
| Configuring RapidHA Sleepy |
|---|
|
Configuring RapidHA as a Sleepy End Device
The Module may be loaded into an MMB Programming Fixture to facilitate a serial USB connection to a PC or Mac. Using the RapidHA Desktop tool, the Module may be configured as a Sleepy End Device using one of the methods detailed below.
XML File Configuration (using RapidHA Desktop)
An XML configuration file may be defined with the following entry for the Device Type Configuration, which will configure the device as a sleepy end-device:
| Code Block |
|---|
<deviceType>
	<reducedFunctionDevice>true</reducedFunctionDevice>
	<sleepy>true</sleepy>
</deviceType> |
This configuration file may then be selected on establishing a connection with the Module with RapidHA Desktop.
You can download an example xml file for a fan controller here.
Device Type Write (during Startup Synchronization)
Another way of configuring the module as a sleepy end-device, is to issue a Device Type Write, with the correct Sleepy and End-Device values in its payload, while configuring the module during the Startup Synchronization phase.
For example, if you issue a Device Type Write frame (PH: 0x03, SH: 0x00) with the following 2-byte Payload: 0x01 0x01, you will configure the module as a Reduced Function Device (RFD) configured in a Sleepy mode.
Initial Behaviour After Configuration
On successful completion of configuration, the device will exhibit one of the following behaviours:
- If the device was not previously joined to a network, it will immediately enter the sleep state forever until woken up
- if the device was previously joined to a network, it will rejoin that network and enter a cycle where it wakes up once every 5s before going back to sleep
Sleep Control Frames
The following Sleep Control frames have been added to the Utility command group (PH: 0x55) in RapidHA v1.7.0.
| Anchor |
|---|
| Sleep Control Wakeup |
|---|
| Sleep Control Wakeup |
|---|
|
Sleep Control Wakeup
| Primary Header | 0x55 |
|---|
| Secondary Header | 0xA0 |
|---|
The Sleep Control Wakeup frame is issued by the Host to the Module to wake the application when it is sleeping. On reception, the application will stay awake for a default duration of 50ms. It is expected that the Host will stuff the 19-byte payload with all 0xFF’s.
The Host may then either send a serial message within the 50ms wake window or issue the Sleepy Control Stay Awake Duration Write command to force the application stay awake for a longer specified duration.
| Byte Index | Field Name | Notes |
|---|
| 0.. 18 | Filler Bytes | Stuff all payload bytes with 0xFF |
| Anchor |
|---|
| Sleep Control Stay Awake Duration Write |
|---|
| Sleep Control Stay Awake Duration Write |
|---|
|
Sleep Control Stay Awake Duration Write
| Primary Header | 0x55 |
|---|
| Secondary Header | 0x58 |
|---|
The Sleep Control Stay Awake Duration Write command is issued by the Host to the Module and serves to impose a duration for which the application will stay awake. This allows the Host to override the standard sleep cycle of the application when desired.
Specifying a Stay Wake Duration of 0 will return the application to the sleep state upon the subsequent application tick, provided there are no pending tasks.
| Bytes | Field Name | Notes |
|---|
| 0.. 3 | Stay Awake Duration | The duration for which the application should stay awake, in milliseconds. A value of 0 will return the application to the sleep state upon the subsequent application tick, provided there are no pending tasks. |
| Anchor |
|---|
| Sleep Control Stay Awake Duration Read |
|---|
| Sleep Control Stay Awake Duration Read |
|---|
|
Sleep Control Stay Awake Duration Read
| Primary Header | 0x55 |
|---|
| Secondary Header | 0x59 |
|---|
The Sleep Control Stay Awake Duration Read command is issued by the Host to the Module to query the Stay Awake Duration of the application. The command has no payload.
| Anchor |
|---|
| Sleep Control Stay Awake Duration Response |
|---|
| Sleep Control Stay Awake Duration Response |
|---|
|
Sleep Control Stay Awake Duration Response
| Primary Header | 0x55 |
|---|
| Secondary Header | 0x5A |
|---|
The Sleep Control Stay Awake Duration Read Response is issued by the Module to the Host in response to a Sleep Control Stay Awake Duration Read command. It conveys the remaining Stay Awake Duration of the application, in milliseconds.
| Bytes | Field Name | Notes |
|---|
| 0.. 3 | Stay Awake Duration | Remaining stay awake duration in milliseconds at the time the Read query was received. |
Serial Control Example
The following section will demonstrate an example of using the new serial interface for interacting with a Sleepy End-Device.
- During the Startup Synchronization phase, configure the device as a Sleepy End-Device, by issuing a Device Write Type frame with payload: 0x01 0x01.
- If not joined to a network, the Module will enter sleep mode until woken up.
- If joined to a network, the Module will wake up every 5s to check for activity. If there are no pending tasks, the Module will go back to sleep for another 5s.
- To interact with a module that is asleep:
- Issue a Sleep Control Wakeup frame.
- Within 50ms, issue a Sleep Control Stay Awake Duration with a desired wake-up duration (can be very large).
- Interact with the module in the desired way
- Either wait for the stay-awake duration to time out, after which the module will go back to sleep - OR issue another Sleep Control Stay Awake Duration with a value of 0, to put the module back to sleep immediately.
Measuring Current Draw
The following steps may be taken to measure the current draw of the Module in the Sleep and Awake states.
- Modify the Module with test points and load into the MMB Programming Fixture (see Hardware Test Points 110199025)
- Using RapidHA Desktop, configure the Module as a Sleepy End Device (see Configuring RapidHA as a Sleepy End Device)
- Ensure that the application is not joined to or attempting to rejoin a network (Network Down); this will be evident in the Network Status information provided in the desktop application
- Close the COM port in RapidHA Desktop
- Connect the Module test points to the External Power Supply and turn on the supply to provide 3.3V (the LDO regulator on the MMB Programming Fixture will allow for this secondary power supply)
- Remove the Module from the MMB Programming Fixture while retaining the connection to the External Power Supply
- Continually powering the Module is required to prevent it from resetting and entering the Startup Synchronization state
- If the application is in the Network Down state:
- The application will be in the Sleep state and the measured current draw of the Module should be < 0.65uA
- If serial access to the Module is available, the Sleep Control Wakeup 110199025 frame may be issued by a Host to wake the application for a default period of 50ms, during which the observed current draw should be ~30mA
- If the application is not in the Network Down state (e.g. Network Up):
- The application will wake once every 5s
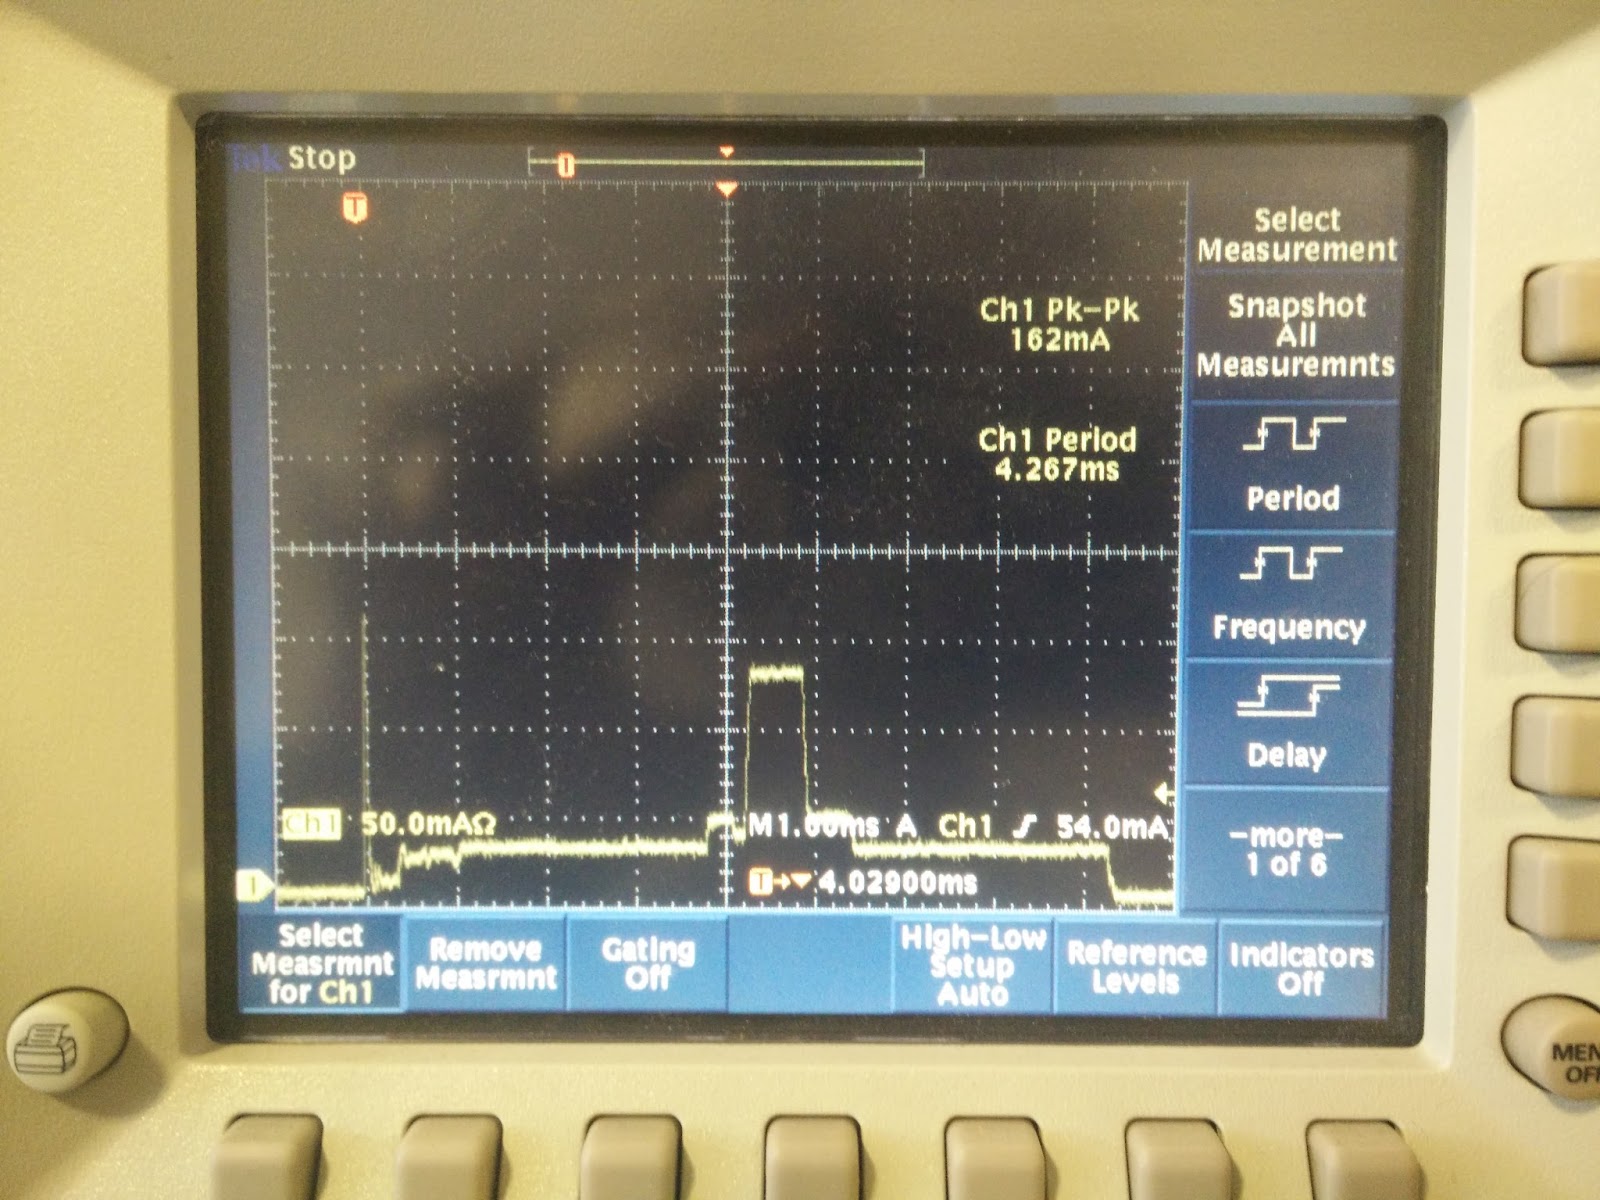
- When awake, the application will transmit data resulting current draw spike of > 140mA
- Likewise, the application will receive data resulting in a current draw spike of ~30mA
- Otherwise, the application will be in the Sleep state and the measured current draw of the Module should be < 0.65uA
- If serial access to the Module is available, the Sleep Control Wakeup110199025 frame may be issued by a Host to wake the application for a default period of 50ms, during which the observed current draw should be ~30mA
The following screenshot shows current draw during network transmission: