Background about IAS Zone Devices
The category of Intruder Alarm System (IAS) Zone devices includes products such as PIR sensors, door/window sensors, and smoke detector sensors. These IAS Zone devices typically have commissioning requirements that are more complex than other Zigbee device types. For example, many IAS Zone devices will broadcast a 'Match Descriptor' request for the IAS Zone client-side cluster and also require zone enrolment. If the IAS Zone cluster is not supported by the Coordinator or zone enrolment is not completed immediately after the sensor joins, it may leave the network.
IAS Zone devices also use a unique mechanism to report changes in attribute states; instead of the typical Zigbee attribute reporting mechanism, they send ZoneStatusChangeNotification commands to a target device when there is a change to the alarm state. The target device is set in the IAS_CIE_Address attribute of the IAS Zone cluster.
In This Guide
The following guide will show you how to join IAS Zone devices to a network formed by a RapidConnect-based Coordinator.
In the first section, RapidConnect Desktop will be used as a Host to configure the Coordinator.
The second section will provide more detail, showing you the serial frames from the RapidConnect Serial Protocol to be implemented in your own Host application.
Using RapidConnect Desktop
Prerequisites
To follow along with these instructions, you will need the following:
- PC or Mac running RapidConnect Desktop
- RapidConnect hardware connected to that PC or Mac via USB.
- IAS Zone device. Typically, any type of security/safety sensor will be implemented as an IAS Zone device. If possible, ensure that the device has achieved Zigbee certification. Otherwise, you may observe strange behaviours.
- We recommend executing these instructions with a network capture running. This will give you a better understanding of the messages that are being sent over the air and whether or not the setup is successful.
Configuring the Coordinator
As mentioned above, IAS Zone devices typically have complex commissioning requirements. As such, some additional configuration steps must be executed before forming the Zigbee network and again when joining the IAS Zone device.
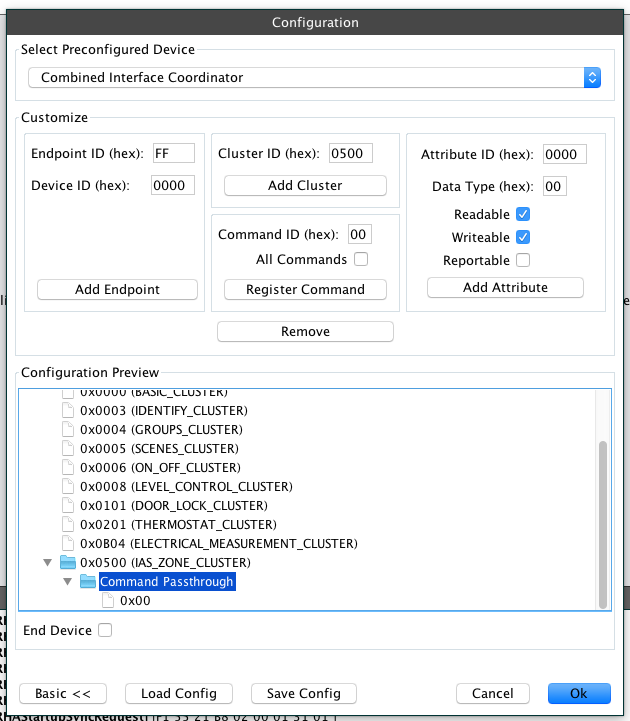
- The RapidConnect hardware that is connected to your PC or MAC via USB must be configured as a Coordinator with the IAS Zone (0x0500) client cluster added. Follow the instructions in the RapidConnect Desktop Advanced Device Configuration guide to add the IAS Zone cluster using the Cluster ID 0x500.
- Still in the Advanced Device Configuration interface, register a Command Passthrough for the ZoneStatusChangeNotification command (Command ID 0x00). Instructions for this are presented in the "Registering a Command Passthrough" section of the Advanced Device Configuration guide. Note that you should only register a passthrough for Command ID 0x00 in Cluster ID 0x0500 - do not check the box to register a passthrough for all commands.
- After you have completed all of these steps, the Configuration window should look like this:
Join an IAS Zone Device
Now that your Coordinator is configured properly, it's time to join the IAS Zone device. You must be ready to execute the remaining steps in quick succession or the IAS Zone device may leave the network.
- Execute the normal process for forming a network and permitting joining. See this guide for more information.
Write to the Device IAS_CIE_Address attribute
As explained above, IAS Zone devices require a target device in order to deliver the ZoneStatusChangeNotification commands. This target is set by writing the value of the IAS_CIE_Address attribute in the IAS Zone cluster of the sensor device.
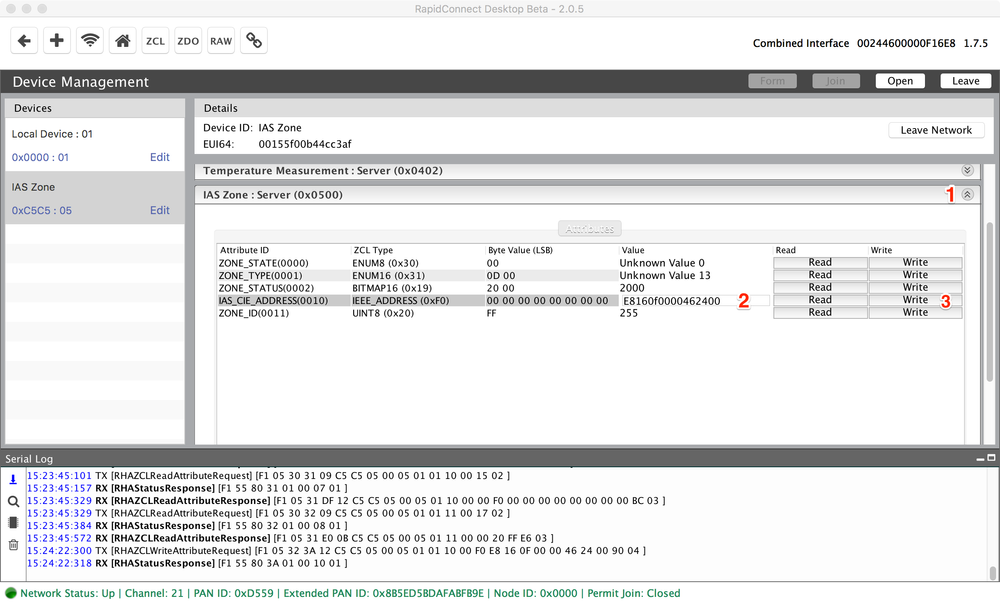
- Open the Device Management tab

- Click on the IAS Zone Device and expand the IAS Zone (0x500) server cluster, as shown with (1) in the diagram below.
- Set the value of the IAS_CIE_Address attribute (Attribute ID 0x0010). In this case, the value should be the EUI64 of the coordinator in LSB format. This is shown with (2) in the diagram below.
- Click on "Write" to send the Write Attribute command. This is shown with (3) in the diagram below. There may be a delay before you receive the response.
Success!
- Once the IAS_CIE_Address attribute has been written, the device will go through the zone enrolment sequence. RapidConnect automatically handles zone enrolment by enrolling devices into a Zone with an ID of 1.
- Upon a successful zone enrolment, the device will now send ZoneStatusChangeNotification commands to the target device. These commands will be passed up from the module to the host wrapped in a ZCL Passthru Message Command - ( PH:0x05, SH:0x20 ). e.g. [RHAZCLPassthroughMessage] [F1 05 20 FD 13 76 E5 01 01 00 05 00 09 00 00 4A 00 06 20 00 00 01 02 00 13 03 ]
| Panel | ||||||
|---|---|---|---|---|---|---|
| ||||||
|
| Panel | ||||||||
|---|---|---|---|---|---|---|---|---|
| ||||||||
|
| Panel | ||||||||||
|---|---|---|---|---|---|---|---|---|---|---|
| ||||||||||
|
| Style |
|---|
{style} .wiki-content h1 { font-family: 'Helvetica Neue', sans-serif; font-size: 30px; font-weight: bold; color: #20b6e1; letter-spacing: 1px; line-height: 1; text-align: left; #border-bottom: 1px solid #98bddd !important; } .wiki-content h2 { font-family: 'Helvetica Neue', sans-serif; font-size: 20px; font-weight: normal; color: #00517f; letter-spacing: 1px; line-height: 1; text-align: left; } .wiki-content h3 { font-family: 'Helvetica Neue', sans-serif; font-size: 15px; font-weight: bold; color: #00517f; letter-spacing: 1px; line-height: 1; text-align: left; } .wiki-content h4 { font-family: 'Helvetica Neue', sans-serif; font-size: 15px; font-weight: normal; font-style:italic; color:#00517f; letter-spacing: 1px; line-height: 1; text-align: left; } #title-text{ font-family: 'Helvetica Neue', sans-serif; font-size: 40px; font-weight: 500; letter-spacing: 1px; line-height: 1; text-align: left; } .panel, #content .panel { -moz-border-radius: 5px; -webkit-border-radius: 5px; border-radius: 5px; } .panel .panelHeader { text-align: left; color: #FFFFFF; line-height: 1em; padding: 10px 10px 5px; margin-bottom: 0; background-color: #00517f; -moz-border-radius-topleft: 5px; -moz-border-radius-topright: 5px; -webkit-border-top-right-radius: 5px; -webkit-border-top-left-radius: 5px; border-top-right-radius: 5px; border-top-left-radius: 5px; color:#FFFFFF } {style} |