Device Configuration
- Luke Tutty (Unlicensed)
- Philip Emsley (Unlicensed)
- Saman Sartipi (Deactivated)
This section shows the steps needed to start the RapidConnect Desktop application and communicate with serially connected devices. The steps outlined here should be completed prior to reviewing this content.
1) Connect Hardware
Plug the RapidConnect USB sticks into the computer(s) on which RapidConnect Desktop was installed.
2) Launch Software
Open an instance of the RapidConnect Desktop by double-clicking on the desktop icon created by the installation process.
RapidConnect Desktop requires a new instance for each device that has been serially connected.
3) Open Serial
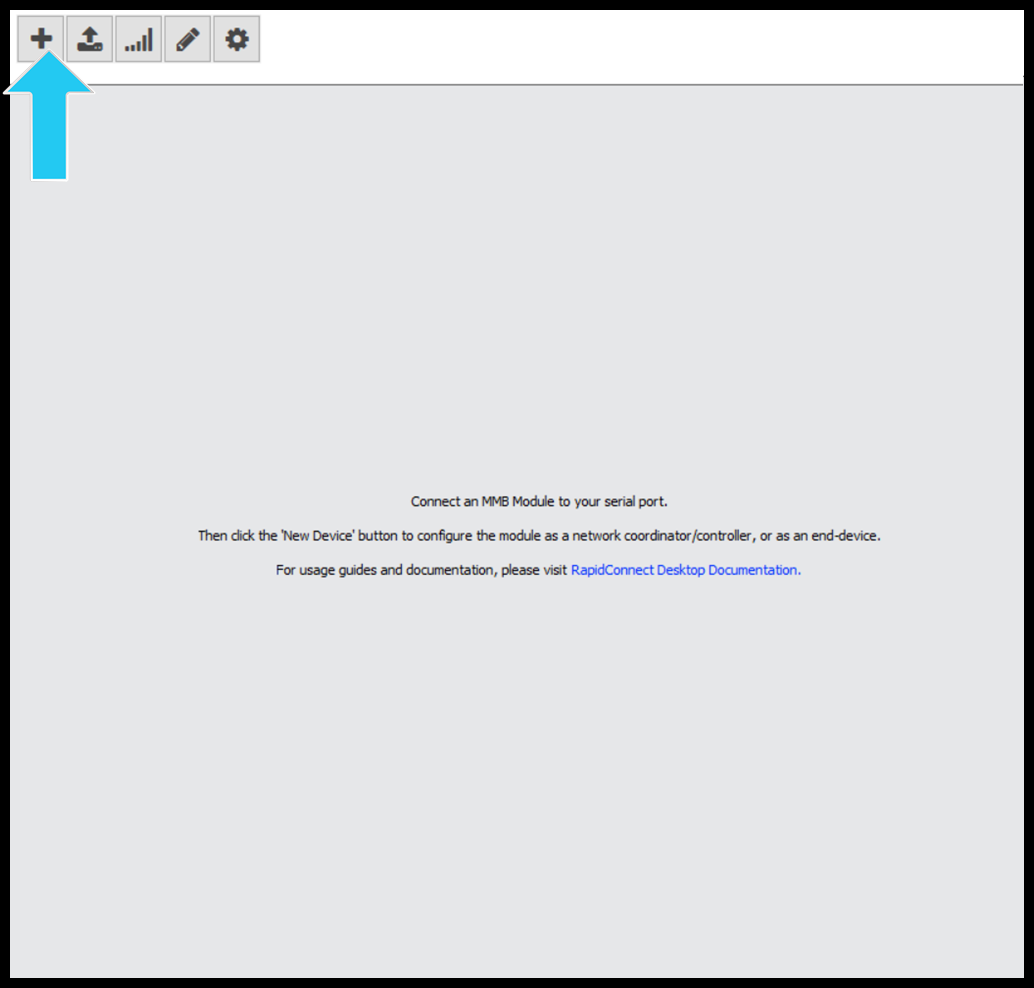
Click on the “New Device” button in the upper left hand corner of the start screen(Figure 1).
Figure 1: Start Screen
4) Select the Device
The configuration step will be slightly different depending on whether or not this is the first time that the device has been configured. Choose one of the two options below.
a) If this is the first time that the device is being configured or a factory reset has been completed....
Select the hardware to be configured. The EUI64 ID will be shown on the device's label (or represented in a QR code). Since the device has never been configured before or a factory reset has been completed, the status should show 'Not Configured' (Figure 2).
Figure 2: Un-Configured Hardware Selected

To proceed, click ‘Continue’.
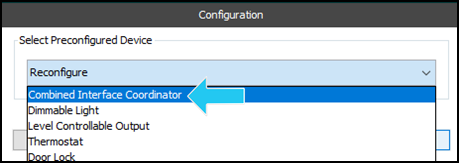
When the Configuration window pops up (Figure 3), select the intended device type.
Proceed to Step 5 if you'd like to execute advanced configuration (e.g. add more endpoints/clusters).
Otherwise, click the 'Ok' button.
Figure 3: Preconfigured Selection
b) If the Device has already been configured...
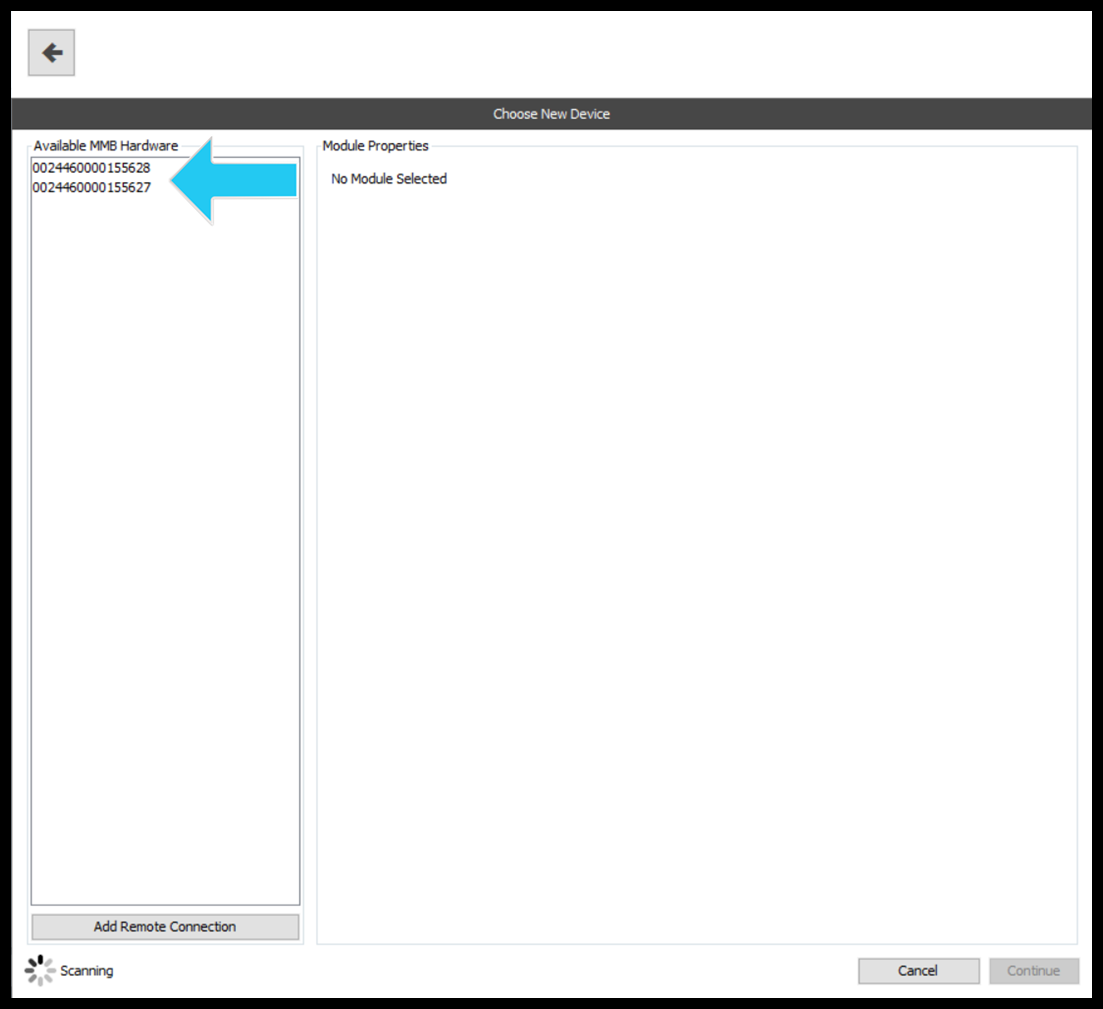
Select the Module to be configured from the list of Available Modules(Figure 4). The EUI64 ID will be shown on the device's label (or represented in a QR code).
Figure 4: Module Picker
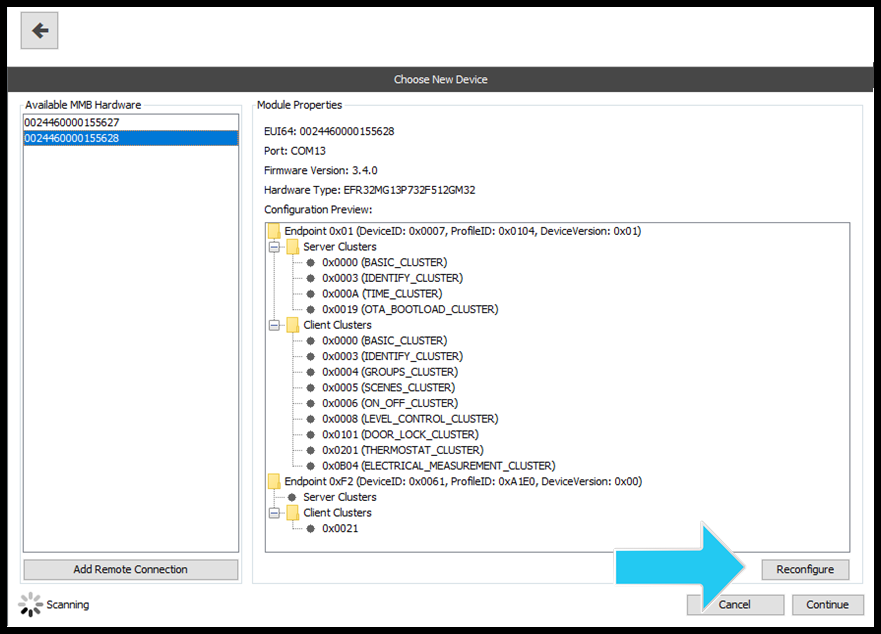
Once a Module is selected, RapidConnect Desktop will read the device configuration and properties(Figure 5).
Figure 5: Module Properties & Configuration
Click "Reconfigure" to go to the next screen.
Proceed to Step 5 if you'd like to execute advanced configuration (e.g. add more endpoints/clusters).
When the Configuration window pops up (Figure 6), select the intended device type.
Otherwise, click the 'Ok' button.
Figure 6: Preconfigured Selection
5) Execute Advanced Device Configuration (Optional)
With RapidConnect Desktop, the device configuration can be customized using the 'Advanced' configuration feature (Figure 7).
Figure 7: Advanced Device Configuration
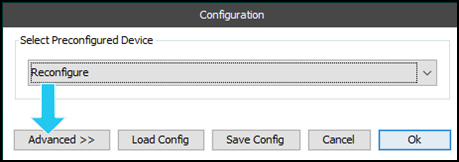
Click on the 'Advanced >>' button ( in the figure above)
Adding an Endpoint
If required, endpoints can be added to the device configuration using the 'Add Endpoint' widget.
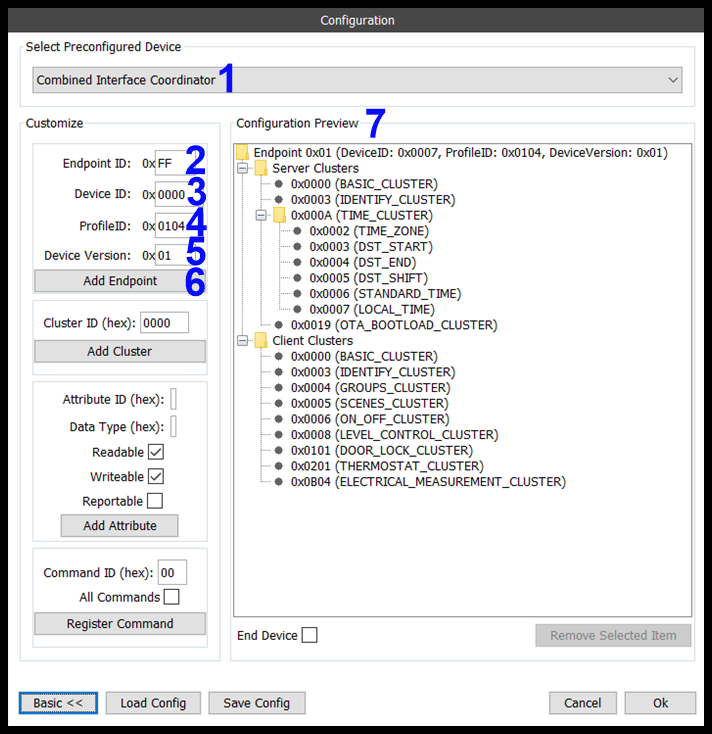
The labels in the figure above show the following:
- Select Preconfigured Device: This dropdown enables you to select a device configuration to be used as a template and then modify as you see fit. In this case the "Combined Interface Coordinator" has been selected.
- New Endpoint ID: The ID(hex) of the new endpoint to be added to the device configuration.
- Device ID: The ID(hex) of the Device Descriptor represented by this endpoint, e.g. 0x0001 for Level Control Switch
- Profile ID:
- Device Version:
- Add Endpoint: Button to add the endpoint.
- Configuration Preview:
Once added, CLICK Register Command button then the endpoint will appear in the configuration preview (see below).
Adding a Cluster
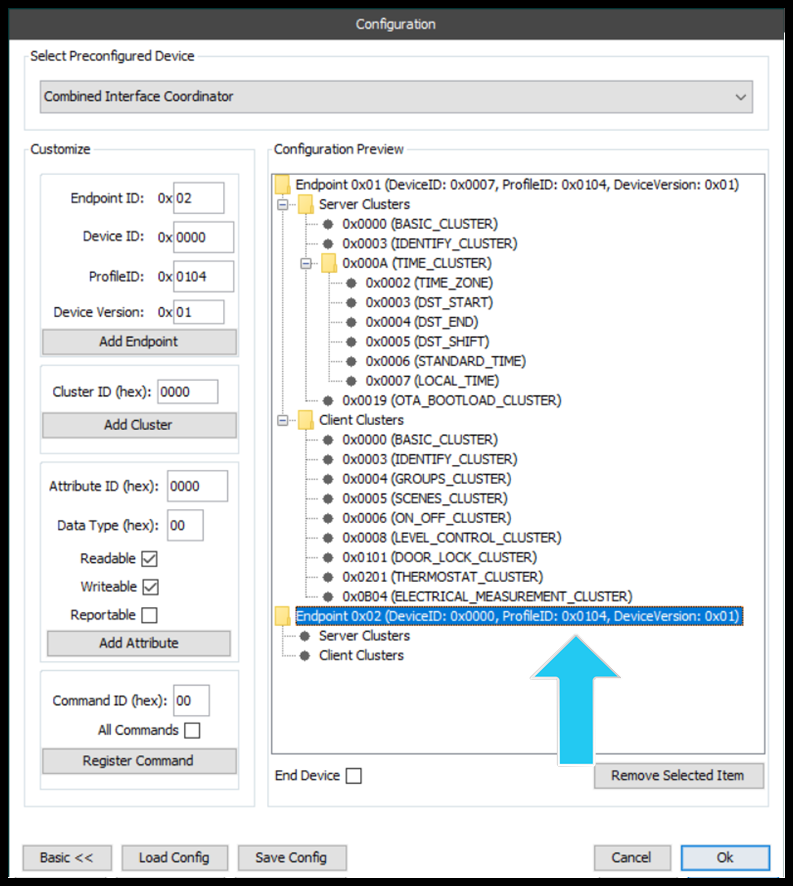
Clusters can be added to new or existing endpoints either as a server cluster or a client cluster. Just select the desired endpoint→Server/Client Cluster group. In the example below, the newly added endpoint is selected and a client cluster is being added.
The following features are labelled in the figure above:
The following features are labelled in the figure above:
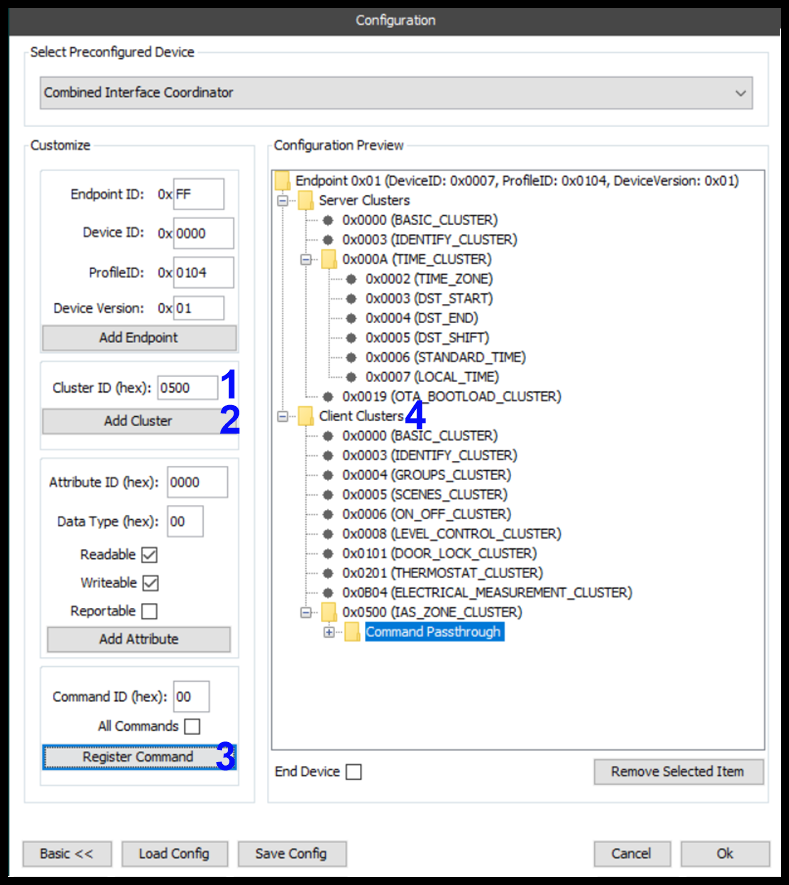
- Cluster ID
- Add Cluster
- Register Command
- Client Cluster
Once added, the cluster will appear in the configuration preview, under the server/client cluster root node. See the figure below.
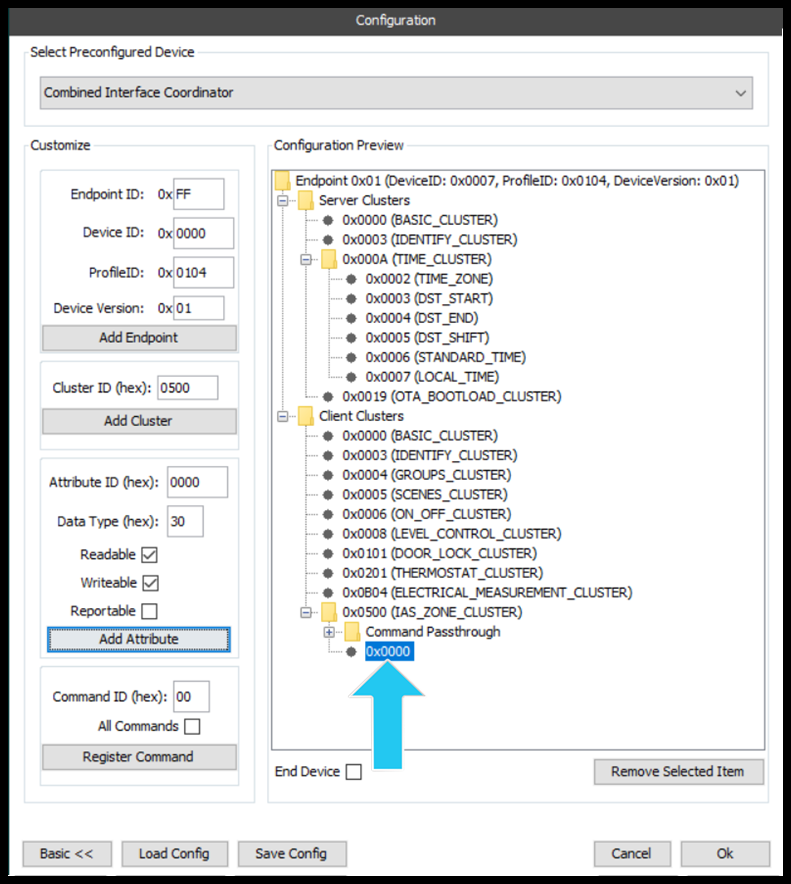
Adding an Attribute
Following the same logic above, attributes are added to clusters in the same fashion.
*Most of the commonly used and/or mandatory attributes will be part of RapidConnect's natively supported clusters and will therefore be added automatically. It should only be necessary to add Attributes to Endpoints if the Attributes are not added automatically. See here for more details.

- Attribute ID: ID(hex) of the attribute to add.
- New Endpoint ID: Date Type of attribute. In this case, attribute 0x000 of the IAS Zone Cluster has a data type of 8-bit Enumeration(0x30).
- Attribute Options: Is the attribute Readable, Writable and/or Reportable.
- Add Attribute: Button to add the Attribute.
- Cluster: Cluster to add the attribute to.
Once an attribute has been added, it will be shown under the cluster, see below.
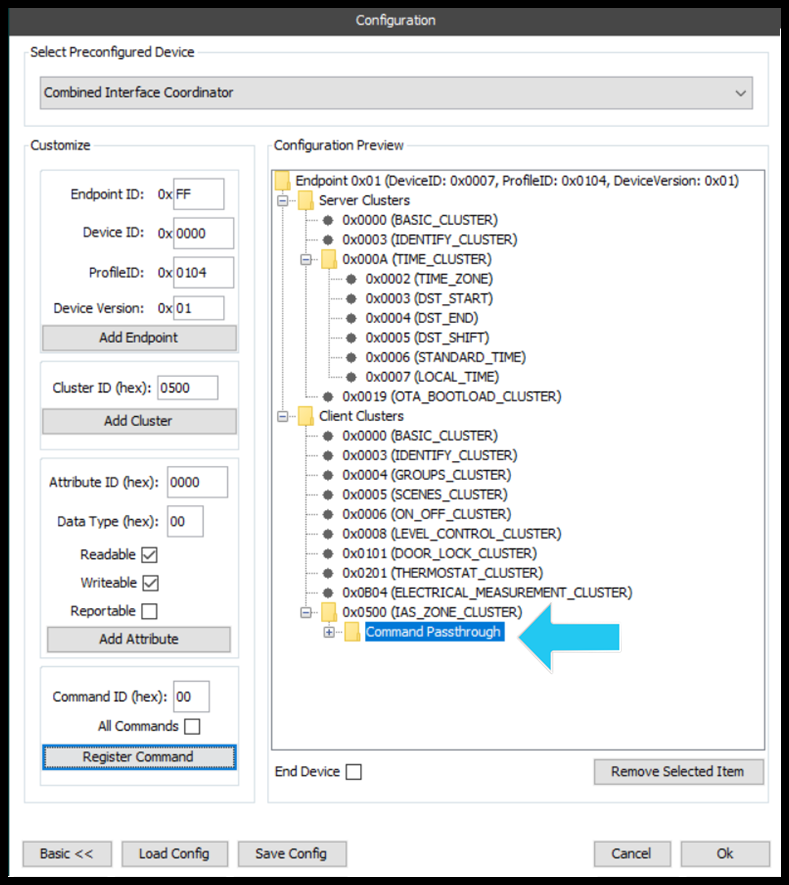
Registering a Command Passthrough
When configuring a device, it may be necessary to 'Register Commands' for passthrough. This mean that commands that are received from another device are not processed by the firmware, but instead passed up to the Host application. This may be necessary if any speciality processing of commands needs to be done, e.g. change state of other remote devices based on the command.
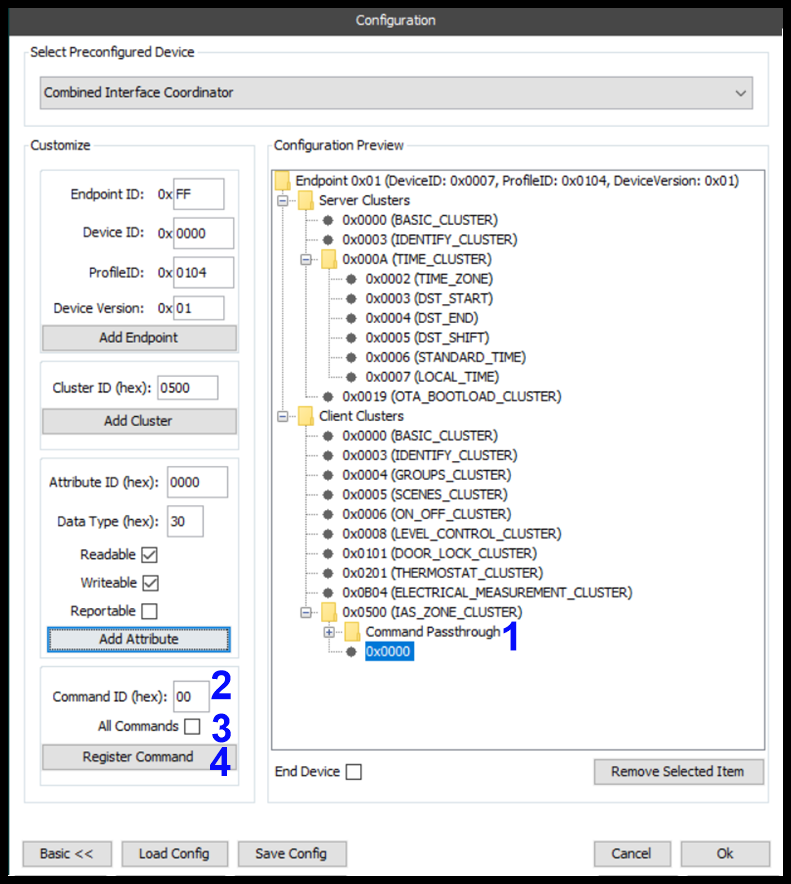
- Cluster Selection: As a specific command originates from a specific cluster, in order to passthrough the command, the cluster root node needs to be selected.
- Command ID: Each command has a cluster specific identifier. To passthrough specific commands, set the ID and register the passthrough for each command.
- All Commands: If it is desired that all commands for a given cluster are passed through, the 'All Commands' checkbox can be selected.
- Register Command: Click this button to send the Register Command Passthrough command.
Once a command passthrough has been registered it can be viewed in the configuration preview, below.
Legal Notices
Copyright © 2020 MMB Networks, Inc. All rights reserved.
Confidential materials prepared and delivered by MMB Networks for receipt and review only by any partner subject to a valid and enforceable MMB Networks confidentiality agreement. Any receipt, review, or misuse of any of the content exchanged hereunder by any party not a party to this confidential exchange shall be subject to any and all rights available under the law. All rights, title and interest to the materials shall remain with MMB Networks.
Any suggestions provided to MMB Networks with respect to MMB Networks' products or services shall be collectively deemed “Feedback.” You, on behalf of yourself, or if you are providing Feedback on behalf of your employer or another entity, represent and warrant that you have full legal authority to bind such entity to these terms, agree to grant and hereby grant to MMB Networks a nonexclusive, perpetual, irrevocable, royalty free, worldwide license to use and otherwise exploit such Feedback within any MMB Networks products and services.