A particular strength of RapidHA is its ability to be easily configured with different endpoints and clusters. The following guide will show you how this can be achieved using the RapidHA Desktop.
Guide
- Open RapidConnect Desktop
- Locate the folder where RapidHA config files are located e.g. on windows "C:\Users\<username>\AppData\Local\Apps\MMB Networks\RapidHA\config"
- Edit the desired XML configuration file that most closely resembles the type of device you want to configure e.g. Coordinator, Doorlock.... A copy can be made of a config file or the user can create a new configuration file.
- When adding/removing clusters to the device configuration, keep in mind the general structure of the config file is
<endpoint id= "1">
<server / client clusters>
<cluster id = xxxxxx>
<attribute .....>
<..../> - Users can add the desired clusters to either the server side or client side, depending on the desired behaviour.
Non-native Server Side clusters may require the user to explicitly add attributes to the cluster element, however many clusters will not require this extra step.
Example:<serverclusters>
<cluster id="0x000A">
<attribute id="0x0002" type="0x2b" writeable="true" />
</cluster id>
</serverclusters>- In RapidHA Desktop select the 'Config' button on the right side of the page. The following window will be displayed.
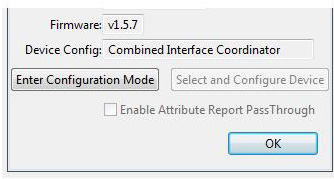
- Select 'Enter Configuration Mode' and then 'Select and Configure Device'.
- Select the new .xml configuration and click OK.
- Once the device Forms or Joins a network you will be able to see the newly added clusters and attributes in the device details window.
| Code Block | ||||||
|---|---|---|---|---|---|---|
| ||||||
<endpoint id="1" profileId="0x0104" deviceId="0x0007" deviceVersion="1"> <serverClusters> <cluster id="0x0000" /> <cluster id="0x0003" /> <cluster id="0x000A"> <attribute id="0x0002" type="0x2b" writeable="true" /> <attribute id="0x0003" type="0x23" writeable="true" /> <attribute id="0x0004" type="0x23" writeable="true" /> <attribute id="0x0005" type="0x2b" writeable="true" /> <attribute id="0x0006" type="0x23" writeable="false" /> <attribute id="0x0007" type="0x23" writeable="false" /> <attribute id="0xF007" type="0x20" writeable="false" /> </cluster> <cluster id="0x0019" /> </serverClusters> <.../> |
| Code Block | ||||||
|---|---|---|---|---|---|---|
| ||||||
<endpoint id="1" profileId="0x0104" deviceId="0x0007" deviceVersion="1"> <serverClusters> <cluster id="0x0000" /> <cluster id="0x0003" /> <cluster id="0x000A"> <attribute id="0x0002" type="0x2b" writeable="true" /> <attribute id="0x0003" type="0x23" writeable="true" /> <attribute id="0x0004" type="0x23" writeable="true" /> <attribute id="0x0005" type="0x2b" writeable="true" /> <attribute id="0x0006" type="0x23" writeable="false" /> <attribute id="0x0007" type="0x23" writeable="false" /> <attribute id="0xF007" type="0x20" writeable="false" /> </cluster> </serverClusters> <clientClusters> <cluster id="0x0006" />//On/off client cluster <cluster id="0x0008" />//Level control cluster </clientClusters> <.../> |
Configuring Endpoints with RapidConnect Desktop
Follow the guide found here for an in-depth look at configuring endpoints quickly and easily with RapidConnect Desktop.
| Panel | ||||
|---|---|---|---|---|
| ||||
|
| Panel | ||||||
|---|---|---|---|---|---|---|
| ||||||
|
| Panel | ||||||||||
|---|---|---|---|---|---|---|---|---|---|---|
| ||||||||||
|
| Style |
|---|
{style} .wiki-content h1 { font-family: 'Helvetica Neue', sans-serif; font-size: 30px; font-weight: bold; color: #20b6e1; letter-spacing: 1px; line-height: 1; text-align: left; #border-bottom: 1px solid #98bddd !important; } .wiki-content h2 { font-family: 'Helvetica Neue', sans-serif; font-size: 20px; font-weight: normal; color: #00517f; letter-spacing: 1px; line-height: 1; text-align: left; } .wiki-content h3 { font-family: 'Helvetica Neue', sans-serif; font-size: 15px; font-weight: bold; color: #00517f; letter-spacing: 1px; line-height: 1; text-align: left; } .wiki-content h4 { font-family: 'Helvetica Neue', sans-serif; font-size: 15px; font-weight: normal; font-style:italic; color:#00517f; letter-spacing: 1px; line-height: 1; text-align: left; } #title-text{ font-family: 'Helvetica Neue', sans-serif; font-size: 40px; font-weight: 500; letter-spacing: 1px; line-height: 1; text-align: left; } .panel, #content .panel { -moz-border-radius: 5px; -webkit-border-radius: 5px; border-radius: 5px; } .panel .panelHeader { text-align: left; color: #FFFFFF; line-height: 1em; padding: 10px 10px 5px; margin-bottom: 0; background-color: #00517f; -moz-border-radius-topleft: 5px; -moz-border-radius-topright: 5px; -webkit-border-top-right-radius: 5px; -webkit-border-top-left-radius: 5px; border-top-right-radius: 5px; border-top-left-radius: 5px; color:#FFFFFF } {style} |