Perform OTA Upgrades with RapidHA Desktop
- Luke Tutty (Unlicensed)
- Tracy W (Deactivated)
The following how-to-guide will take you through the steps required to initiate OTA upgrade using the RapidHA Desktop application.
Guide
Launch Application
Open the RapidHA Desktop application.
Open Serial Port
Within the program, click on the button labeled “Open” which is located in the upper right hand corner of the program window and choose the serial port corresponding to the USB device (almost always the only one).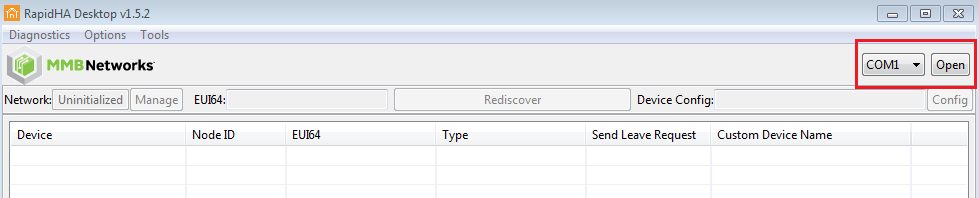
Configure Coordinator
Within program instance, click the button labeled “Config” that is located in the upper right hand corner of the program window. The Device Configuration popup window will appear. It might also pop-up automatically when you open the serial port. From this popup window, click Enter Config Mode then “Select” to open a list of configuration files. The USB stick must be configured as the ZigBee coordinator. This is done by selecting and opening the file “coordinator.xml” in the config folder. Steps 1-3 below highlight the actions described above.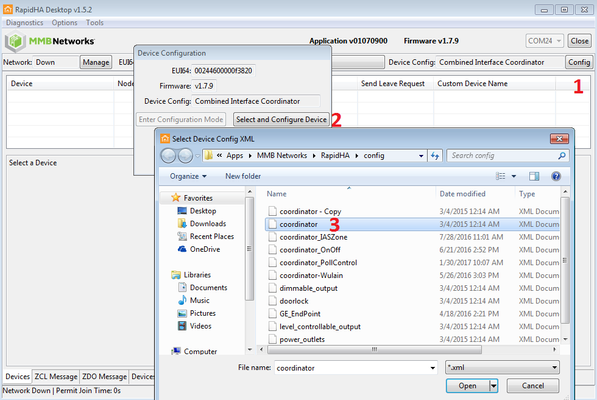
Form a Network
Click on the button labeled “Manage” located on the upper left side of the program window. If the status is 'Down' click Form a Network. Then OK to close this window.
Load the OTA File
Select "Combined Device" in the Device Window at the top (not the Leave Network button) then scroll to the bottom of the Cluster Status Window at the bottom right to the OTA Upgrade Section.
Join a device to Upgrade Join your OTA upgradable device to your network.
Accelerate: The OTA transfer will start automatically - this might take several seconds to a minute. You can track it's progress in the OTA Upgrade section of the Cluster Status for the window at the bottom right for the Combined Interface . However, the speed is throttled and will take time. To speed it up you can issue a command to the device to ignore the throttling. First, make note of the node ID. This can be found either at the top in the device window, or in the OTA Upgrade status window. You'll see a 6 character ID - 0xXXXX, where XXXX are randomly assigned characters - only the last 4 characters matter. With that written down, click on the ZCL tab at the bottom left and enter the fields according to the screen shot below. The payload is: 97 00 00 00 00 00 00 00 00 01 00.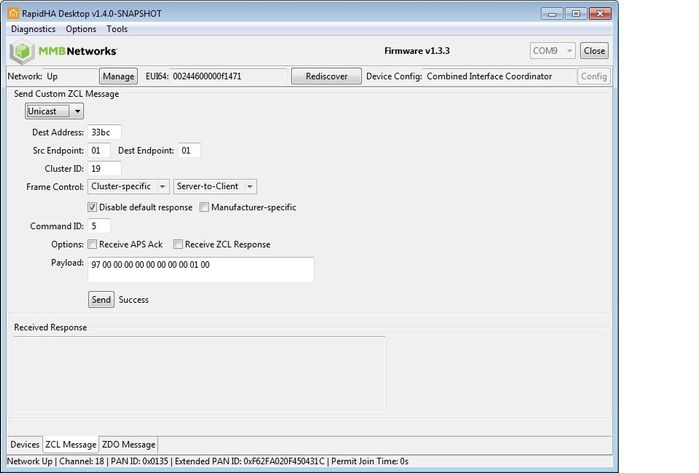
Confirmation: Once the OTA is complete, your device will reset.
Leave the Network: Once the OTA update is complete, have your device leave the network.
Filter by label
There are no items with the selected labels at this time.
Related content
Legal Notices
Copyright © 2020 MMB Networks, Inc. All rights reserved.
Confidential materials prepared and delivered by MMB Networks for receipt and review only by any partner subject to a valid and enforceable MMB Networks confidentiality agreement. Any receipt, review, or misuse of any of the content exchanged hereunder by any party not a party to this confidential exchange shall be subject to any and all rights available under the law. All rights, title and interest to the materials shall remain with MMB Networks.
Any suggestions provided to MMB Networks with respect to MMB Networks' products or services shall be collectively deemed “Feedback.” You, on behalf of yourself, or if you are providing Feedback on behalf of your employer or another entity, represent and warrant that you have full legal authority to bind such entity to these terms, agree to grant and hereby grant to MMB Networks a nonexclusive, perpetual, irrevocable, royalty free, worldwide license to use and otherwise exploit such Feedback within any MMB Networks products and services.